
Le Mercure au 1/36 - plans Jean Boudriot
Marine et Modélisme d'Arsenal :: MONOGRAPHIES :: MONOGRAPHIES :: Le Mercure 1730 - Plans Jean Boudriot
Page 10 sur 10 •  1, 2, 3, 4, 5, 6, 7, 8, 9, 10
Re: Le Mercure au 1/36 - plans Jean Boudriot
Scooter Ven 22 Oct 2021 - 14:02
Do you mean nail through the plank to support the glue?
Or nails on the outside edge of the plank instead of clamps? If this is what you mean this is precisely what I will do when the angle of the planks change as I approach the keel and use pear.
====================
G Delacroix - Oui, il ne fait aucun doute que cela prend du temps. Je suis heureux de travailler lentement pour obtenir des résultats précis.
Voulez-vous dire des clous à travers la planche pour soutenir la colle ?
Ou des clous sur le bord extérieur de la planche au lieu de pinces ? Si c'est ce que vous voulez dire, c'est précisément ce que je ferai lorsque l'angle des planches changera à l'approche de la quille et que j'utiliserai du poirier.
Scooter- Messages : 141
Date d'inscription : 03/01/2020
Re: Le Mercure au 1/36 - plans Jean Boudriot
le Spahi Ven 22 Oct 2021 - 14:06


le Spahi- Messages : 2488
Date d'inscription : 09/06/2017
Localisation : Irlande -

Re: Le Mercure au 1/36 - plans Jean Boudriot
G. Delacroix Ven 22 Oct 2021 - 14:12
---------
I'm talking about the real nails in the wale, the final nails that would hold the plank in place in addition to the glue (and during drying).

G. Delacroix- Admin
- Messages : 11128
Date d'inscription : 21/05/2010
Localisation : Toulouse -
Re: Le Mercure au 1/36 - plans Jean Boudriot
Scooter Ven 22 Oct 2021 - 14:15
============
Je vais finir les préceintes avec des clous mais cela sera fait plus tard à des fins décoratives après le bordage complet de la coque et le ponçage.
Scooter- Messages : 141
Date d'inscription : 03/01/2020
Localisation : Adelaide, Australia
HB 17 aime ce message
Re: Le Mercure au 1/36 - plans Jean Boudriot
Scooter Lun 8 Nov 2021 - 11:32
Tonight, I gave them a very light sand with 120 grit paper. I still need to remove a further 1mm from them.
However, I won't do this until the pear under the wales has also been planked.
This is my next job....
================
J'ai travaillé très lentement au cours de la dernière semaine, mais j'ai maintenant terminé le bordage des préceintes principales.
Ce soir, je leur ai donné un très léger ponçage avec du papier grain 120. Je dois encore enlever 1 mm de plus.
Cependant, je ne le ferai pas tant que le poirier sous les préceintes n'aura pas été également bordé.
C'est mon prochain travail....


Scooter- Messages : 141
Date d'inscription : 03/01/2020
Localisation : Adelaide, Australia
radiau et jean-paul.perraudin0079 aiment ce message
Re: Le Mercure au 1/36 - plans Jean Boudriot
Daniel. Bétremieux Lun 8 Nov 2021 - 12:05
Daniel.

Daniel. Bétremieux- Messages : 639
Date d'inscription : 04/04/2019
Localisation : Saint Pierre des Corps (37)
Re: Le Mercure au 1/36 - plans Jean Boudriot
G. Delacroix Lun 8 Nov 2021 - 12:07
Joli travail, le ponçage rend très bien. Ne craignez vous pas que la poussière du charme noir ne tache le poirier au ponçage ?
------
Nice work, the sanding looks great. Aren't you afraid that the dust from the black hornbeam will stain the pearwood when sanding?
G. Delacroix- Admin
- Messages : 11128
Date d'inscription : 21/05/2010
Localisation : Toulouse -
Re: Le Mercure au 1/36 - plans Jean Boudriot
Scooter Lun 8 Nov 2021 - 12:17
You raise a very good point and I learned this the hard way when I made my stern piece.
The dust form the black hornbeam will stain the pear (on the surface only) so essentially you always need to sand the pear last to remove any traces of dust from the hornbeam.
The possibility exists for me to sand the hornbeam further now, leaving perhaps 0.1mm to finish later once the pear has been completed. But this 0.1mm will still cause a problem. I cannot completely finish the hornbeam now because later when I sand the pear it will be impossible to do this without touching the hornbeam.
I have my thoughts on how I will solve this problem later. If my plan fails I am in big trouble....

===============
Bonjour !
Vous soulevez un très bon point et je l'ai appris à mes dépens lorsque j'ai fabriqué ma pièce de poupe.
La poussière du charme noir va tacher le poirier (en surface seulement), donc il faut toujours poncer le poirier en dernier pour enlever toute trace de poussière du charme.
J'ai la possibilité de poncer davantage le charme maintenant, laissant peut-être 0,1 mm à finir plus tard, une fois le poirier terminé. Mais ces 0,1 mm poseront encore un problème. Je ne peux pas finir complètement le charme maintenant parce que plus tard, lorsque je poncerai le poirier, il sera impossible de le faire sans toucher le charme.
Je vais réfléchir à la façon dont je vais résoudre ce problème plus tard. Si mon plan échoue, je vais avoir de gros problèmes.....
Scooter- Messages : 141
Date d'inscription : 03/01/2020
Localisation : Adelaide, Australia
Re: Le Mercure au 1/36 - plans Jean Boudriot
Daniel. Bétremieux Lun 8 Nov 2021 - 13:27
Du charme noir, je ne connais pas! est-ce un autre nom de l'ébène?
Merci.
Daniel.
Daniel. Bétremieux- Messages : 639
Date d'inscription : 04/04/2019
Localisation : Saint Pierre des Corps (37)
Re: Le Mercure au 1/36 - plans Jean Boudriot
Scooter Lun 8 Nov 2021 - 23:37
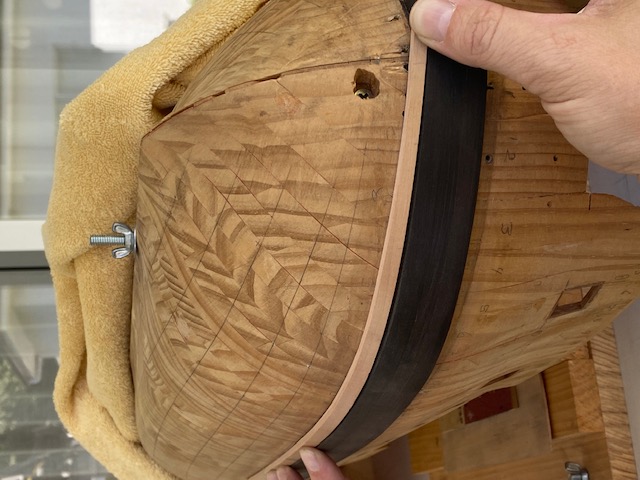
Black hornbeam is not Ebony, it is a different wood entirely.
My understanding is that the white hornbeam (from the tree) is seeped in a chemical which turns the wood black not just on the surface but through the entire thickness.
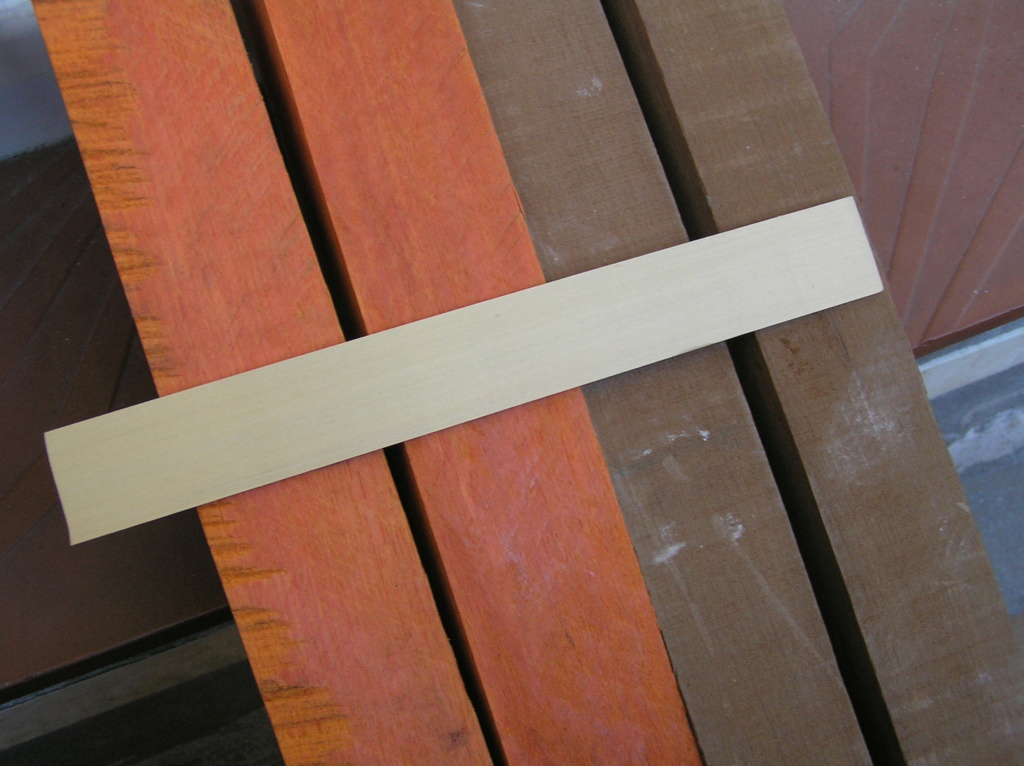
The same chemical process can be applied to achieve other colours such as orange, green, red, yellow and brown (see attached photos).
My Russian colleague sends me this wood from his supplier in St Petersburg.
Apparently the Romans used Hornbeam to make their chariots as the wood is very hard.
=========================
Bonjour Daniel,
Le charme noir n'est pas de l'ébène, c'est un bois entièrement différent.
Je crois savoir que le charme blanc (de l'arbre) est imprégné d'un produit chimique qui rend le bois noir non seulement en surface mais dans toute son épaisseur.
Le même procédé chimique peut être appliqué pour obtenir d'autres couleurs comme l'orange, le vert, le rouge, le jaune et le brun (voir les photos ci-jointes).
Mon collègue russe m'envoie ce bois de son fournisseur de Saint-Pétersbourg.
Apparemment, les Romains utilisaient le charme pour fabriquer leurs chars, car ce bois est très dur.
Traduit avec www.DeepL.com/Translator (version gratuite)

Scooter- Messages : 141
Date d'inscription : 03/01/2020
Localisation : Adelaide, Australia
HB 17 aime ce message
Re: Le Mercure au 1/36 - plans Jean Boudriot
Daniel. Bétremieux Mar 9 Nov 2021 - 9:30
Daniel. Bétremieux- Messages : 639
Date d'inscription : 04/04/2019
Localisation : Saint Pierre des Corps (37)
Re: Le Mercure au 1/36 - plans Jean Boudriot
Scooter Dim 12 Déc 2021 - 7:00
I'll do this over a series of posts.
In my first post I will show you how I bend planks in multiple axis for use at the bow (note the emphasis!).
As you will have seen in my previous posts, Ammonia allows me to do this easily in one action and has no spring back. It is, in some ways, a perfect solution. However, unfortunately Ammonia changes the colour of lighter coloured woods so is not usable in this instance. As such, my process will describe my technique in the use of steam.
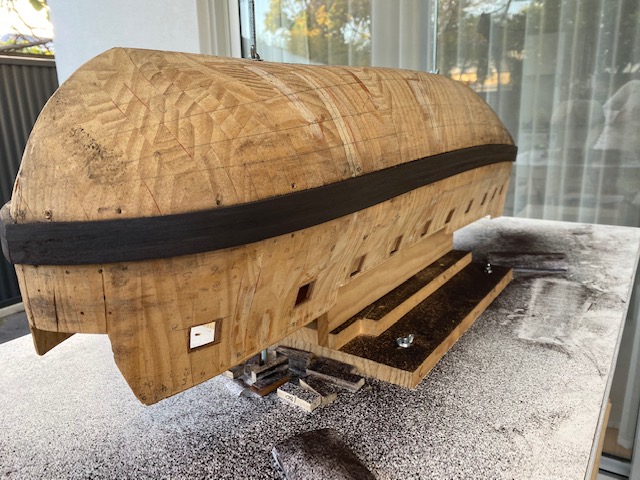
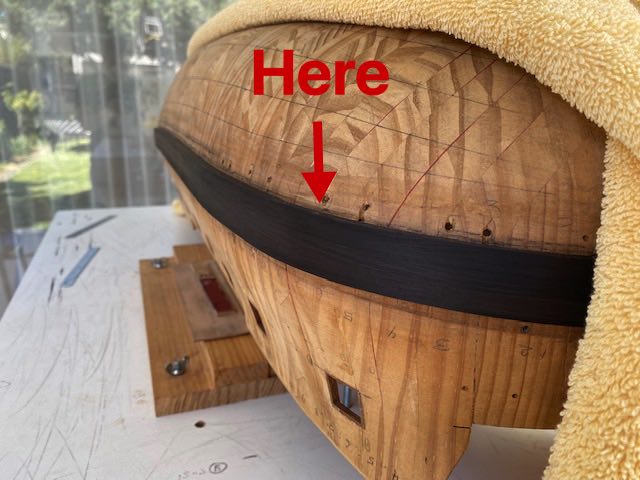
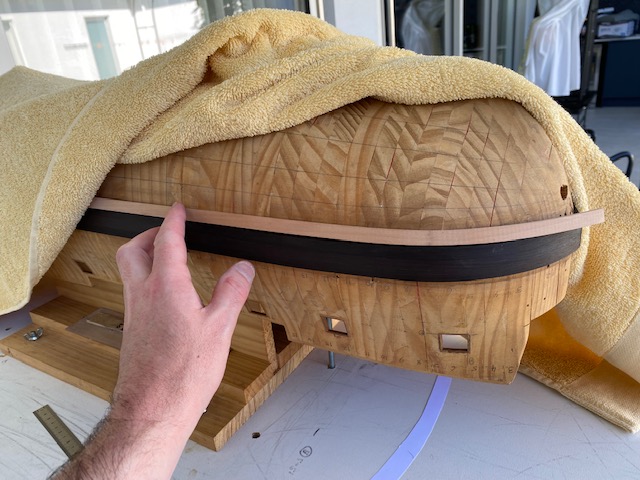
Let's focus on my first pear plank at the bow immediately below the wales. Please see FirstPlank.jpg ("Here" shows where it will go). This plank must bend almost 90 degrees at the bow (in one axis) but it must also bend upwards quite significantly (in the second axis) to maintain a "straight" line against the bottom plank of the wales. Please bear in mind during this process my planks are quite thick (3.5mm).
I break this process down in to a few steps:
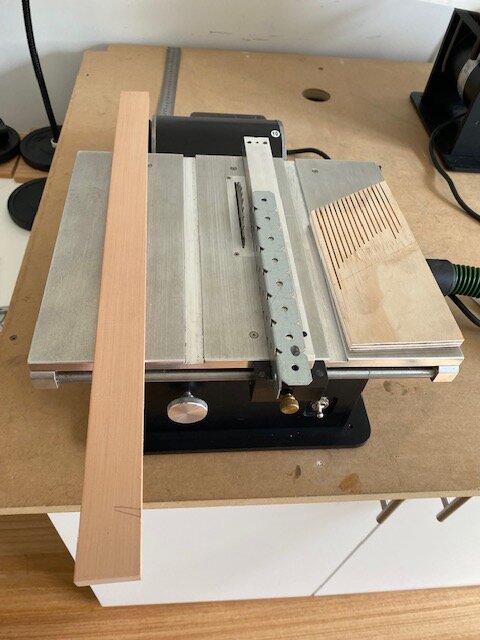
Step 1: From my stock I cut down some double thick planks bearing in mind that this piece will turn in to 2 planks - one of the port side and the equivalent plank on the starboard side. Bearing in mind that my planks will be 3.5mm thick, this piece is about 7.8mm thick because I am allowing 0.5mm for the thickness of my band saw + 0.3mm additional thickness for any minor errors. Please see OriginalStock.jpg and CutDoublePlanks1.jpg and CutDoublePlanks2.jpg
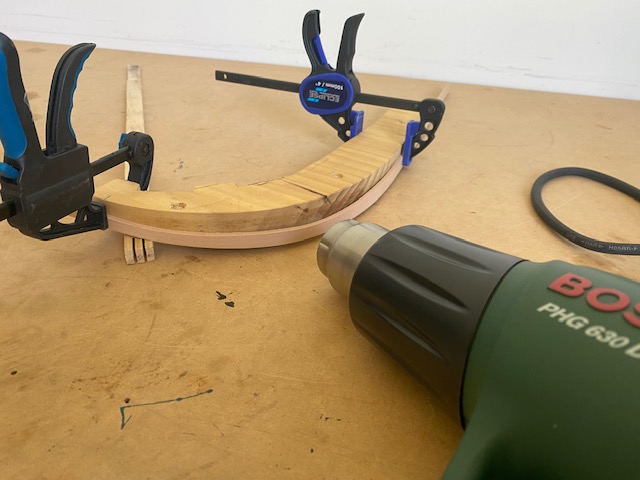
Step 2: I then steam this entire single piece for 35 min. See Steaming.jpg
Step 3: I then take the entire piece to my pre-made jig and bend it for 24 hours. Note, this bend is going to be the bend in the "second axis" described above.
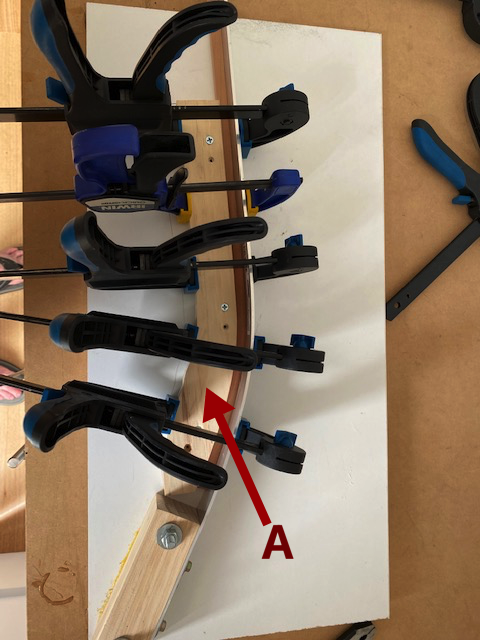
Please note the mould "A" in the photo of my jig. The curve in this mould has been cut to a specific shape to ensure my final piece of wood, once removed from the jig, will spring back to the exact position. As such, the mould "A" has a curve which is fractionally stronger than I need in my final piece of pear. I personally find I need to do this by about 30-40%. See Jig1.jpg and Jig2.jpg
Step 4: When I remove the piece from the jig it has the correct bend in it. Remember this is going to turn in to 2 planks very shortly.
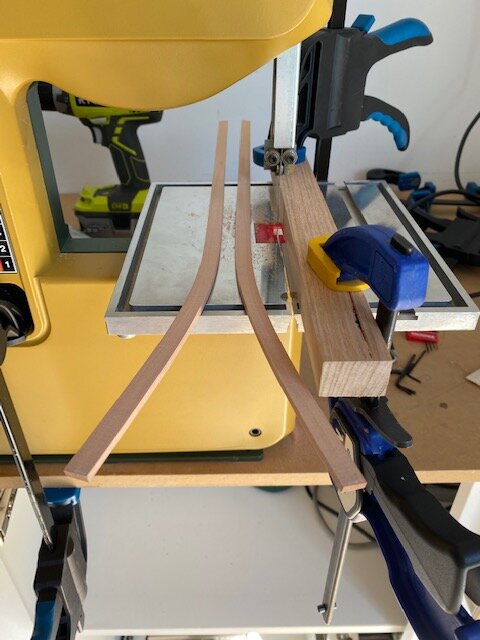
Step 5: I carefully setup my band saw with a fence (attached very tightly!) and run the piece of pear through the band saw slowly and carefully to cut it into 2 perfectly symmetrical pieces (one for each side of the model) with identical thicknesses (about 3.7mm). See BandSaw1.jpg showing the entire piece as it was when it was removed from the jig and just before I ran it through the band saw. Also, BandSaw2.jpg showing the piece after it has been cut in the Band Saw in to 2 symmetrical planks.
Step 6: These pieces are each then bent (with dry heat - in my case using a heat gun @ 190C) carefully and slowly almost 90 degrees so they each curve around the bow exactly as required. This can be a slow process and you need to keep going back to the model to measure progress every minute or so. See HeatGun.jpg
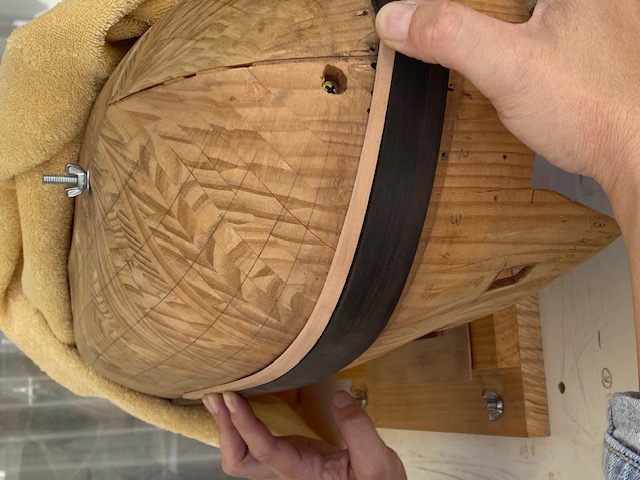
Step 7: The final plank will now have the correct bend in 2 axis. See BentPlank1.jpg and BentPlank2.jpg
In these photos the planks needs a little more bending with the heat gun. I ran out of time today!
Even after this bending process the pieces of pear are not quite finished yet.
I will need to put the correct angle on the top and bottom edges of both planks so they meet adjacent planks correctly. I'll also need to taper the planks at the front edge.
=================================
J'ai pensé que je pourrais partager ma technologie pour plier les planches à l'avant, car je sais que ce sujet a été abordé à plusieurs reprises sur un certain nombre de forums dans le passé.
Je vais le faire dans une série de messages.
Dans mon premier article, je vous montrerai comment je plie les planches dans plusieurs axes pour les utiliser à la proue (notez l'accentuation !).
Comme vous l'avez vu dans mes précédents billets, l'ammoniaque me permet de le faire facilement en une seule action et sans retour élastique. C'est, d'une certaine manière, une solution parfaite. Mais malheureusement, l'ammoniaque modifie la couleur des bois clairs et n'est donc pas utilisable dans ce cas. Mon procédé décrira donc ma technique d'utilisation de la vapeur.
Concentrons-nous sur ma première planche de poirier à l'avant, immédiatement sous les préceintes. Veuillez voir FirstPlank.jpg ("Here" montre où elle va aller). Cette planche doit se plier à presque 90 degrés à la proue (dans un axe) mais elle doit aussi se plier vers le haut de manière assez significative (dans le deuxième axe) pour maintenir une ligne "droite" contre la planche inférieure des préceintes. N'oubliez pas que mes planches sont assez épaisses (3,5 mm).
Je décompose ce processus en plusieurs étapes :
Etape 1 : Dans mon stock, je coupe des planches de double épaisseur en gardant à l'esprit que cette pièce sera transformée en 2 planches - une du côté bâbord et la planche équivalente du côté tribord. En gardant à l'esprit que mes planches auront une épaisseur de 3,5 mm, cette pièce a une épaisseur d'environ 7,8 mm, car je prévois 0,5 mm pour l'épaisseur de ma scie à ruban + 0,3 mm d'épaisseur supplémentaire pour toute erreur mineure. Veuillez voir OriginalStock.jpg et CutDoublePlanks1.jpg et CutDoublePlanks2.jpg.
Etape 2 : Je fais ensuite cuire cette pièce unique à la vapeur pendant 35 minutes. Voir Steaming.jpg
Étape 3 : Je place ensuite la pièce entière sur mon gabarit préfabriqué et je la plie pendant 24 heures. Notez que ce pliage sera le pliage du "deuxième axe" décrit ci-dessus.
Veuillez noter le moule "A" sur la photo de mon gabarit. La courbe de ce moule a été coupée à une forme spécifique pour garantir que ma pièce de bois finale, une fois retirée du gabarit, reviendra à la position exacte. Ainsi, la courbe du moule "A" est un peu plus forte que celle dont j'ai besoin pour ma pièce de poirier finale. Personnellement, je trouve que je dois le faire de 30 à 40 %. Voir Jig1.jpg et Jig2.jpg
Étape 4 : Quand je retire la pièce du gabarit, elle a la bonne courbure. Rappelez-vous que cette pièce va se transformer en deux planches très bientôt.
Étape 5 : J'installe soigneusement ma scie à ruban avec un guide (fixé très solidement !) et je passe le morceau de poirier dans la scie à ruban lentement et soigneusement pour le couper en 2 morceaux parfaitement symétriques (un pour chaque côté du modèle) avec des épaisseurs identiques (environ 3.7mm). Voir BandSaw1.jpg montrant la pièce entière telle qu'elle était lorsqu'elle a été retirée du gabarit et juste avant que je la passe à la scie à ruban. Egalement, BandSaw2.jpg montrant la pièce après qu'elle ait été coupée à la scie à ruban en 2 planches symétriques.
Étape 6 : Ces pièces sont ensuite pliées (avec de la chaleur sèche - dans mon cas en utilisant un pistolet à chaleur à 190C) soigneusement et lentement à presque 90 degrés afin qu'elles se courbent autour de l'arc exactement comme il faut. Cela peut être un processus lent et vous devez revenir au modèle pour mesurer les progrès chaque minute ou presque. Voir HeatGun.jpg
Étape 7 : La planche finale aura maintenant la courbure correcte dans 2 axes. Voir BentPlank1.jpg et BentPlank2.jpg
Sur ces photos, les planches ont besoin d'être pliées un peu plus avec le pistolet thermique. Je n'ai pas eu le temps aujourd'hui !
Même après ce processus de pliage, les morceaux de poirier ne sont pas encore tout à fait finis.
Je vais devoir mettre le bon angle sur les bords supérieurs et inférieurs des deux planches pour qu'elles rencontrent correctement les planches adjacentes. Je vais également devoir effiler les planches au niveau du bord avant.


Scooter- Messages : 141
Date d'inscription : 03/01/2020
Localisation : Adelaide, Australia
HB 17 aime ce message
Re: Le Mercure au 1/36 - plans Jean Boudriot
Scooter Dim 12 Déc 2021 - 7:03
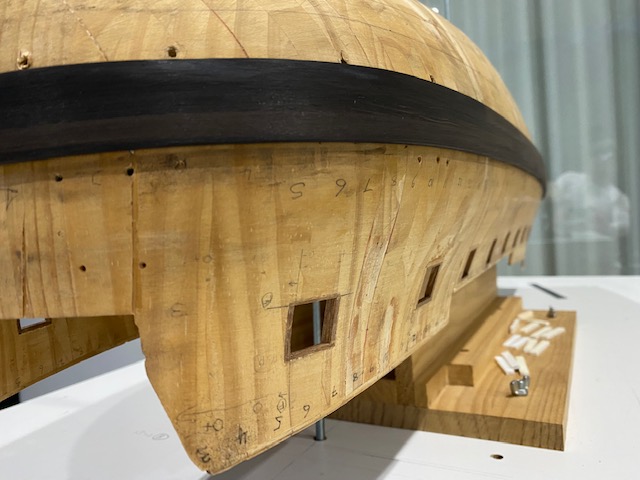
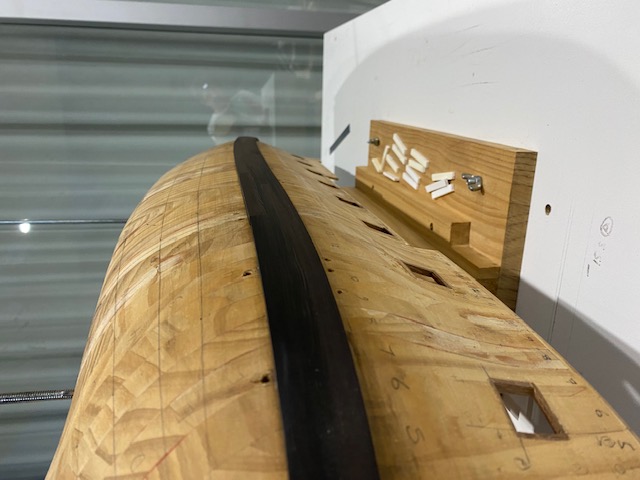
Note the long piece of flat wood on the left of the photo that the edge of the sanding sick os resting on. This is very important as it controls the angle of scraping and sanding and prevents "rocking of the hand" ensuring that the edge of the plank is sanded as a flat surface. This is crucial so that the next plank that sits on this surface has a tight join minimising the visible caulking line.
From a previous post you will understand that I have divided the hull into "bands" delineated with the pencil lines. 4 planks need to fit in to this first band and as such, the width of the plank is 1/4 of the height of the band at all points. As a consequence of the band becoming narrower at the bow of the model the plank must be tapered accordingly. There is quite a bit of work here to the extent that I scrape and test against the model and repeat this process many times.
TestingFit1.jpg and TestingFit2.jpg show how the plank will sit after the tapering.
I also show DryHeat.jpg showing how I apply the dry heat as per my previous post. I find that using a jig (a previous cut shape of wood) is very helpful. After I have applied the dry heat I allow the plank to sit in the jig overnight.
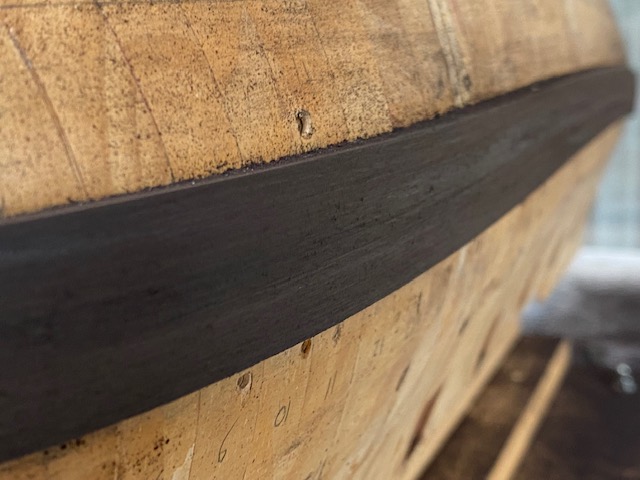
One last photo I will show you all is CaulkingLines.jpg
We have had some very hot days in Adelaide and some of the caulking lines have opened slightly compared to when I built this stern piece. This is very annoying.
My Russian colleague cautioned me about the use of pear and its known expansion/contraction. I am now having reservations about planking my hull with it although it probably is too late.
Interestingly my deck, which was planked in Castello, and has been subject to the same weather, has not moved a fraction: Deck.jpg
(Deck photo has substantially more ZOOM than the other photo so the comparison may not be good by photo only...)
================================
Ici, vous pouvez voir que la planche a été effilée à l'avant avec 2 outils : un grattoir et un bâton de ponçage : PlankTapering.jpg
Notez le long morceau de bois plat à gauche de la photo sur lequel repose le bord du bâton de ponçage. C'est très important car cela permet de contrôler l'angle de raclage et de ponçage et d'éviter le "balancement de la main", ce qui garantit que le bord de la planche est poncé comme une surface plane. C'est essentiel pour que la planche suivante, qui repose sur cette surface, ait un joint serré, minimisant ainsi la ligne de calfeutrage visible.
Dans un post précédent, vous comprendrez que j'ai divisé la coque en "bandes" délimitées par les lignes de crayon. 4 planches doivent s'adapter à cette première bande et en tant que telle, la largeur de la planche est 1/4 de la hauteur de la bande en tout point. La bande devenant plus étroite à l'avant du modèle, la planche doit être effilée en conséquence. Il y a beaucoup de travail à faire ici, dans la mesure où je gratte et teste contre le modèle et répète ce processus de nombreuses fois.
TestingFit1.jpg et TestingFit2.jpg montrent la position de la planche après l'effilage.
Je montre aussi DryHeat.jpg qui montre comment j'applique la chaleur sèche comme dans mon précédent post. Je trouve que l'utilisation d'un gabarit (une forme de bois déjà coupée) est très utile. Après avoir appliqué la chaleur sèche, je laisse la planche reposer dans le gabarit toute la nuit.
Une dernière photo que je vais vous montrer est CaulkingLines.jpg.
Nous avons eu quelques jours très chauds à Adélaïde et certaines lignes de calfeutrage se sont légèrement ouvertes par rapport à ce que j'ai construit pour cette pièce arrière. C'est très ennuyeux.
Mon collègue russe m'a mis en garde contre l'utilisation du poirier et sa dilatation/contraction connue. J'ai maintenant des réserves quant au bordage de ma coque avec ce matériau, même s'il est probablement trop tard.
Il est intéressant de noter que mon pont, qui a été bordé à Castello, et qui a été soumis aux mêmes conditions météorologiques, n'a pas bougé d'une fraction : Deck.jpg
(La photo du pont a beaucoup plus de ZOOM que l'autre photo, donc la comparaison peut ne pas être bonne par photo seulement...)


Scooter- Messages : 141
Date d'inscription : 03/01/2020
Localisation : Adelaide, Australia
G. Delacroix, radiau, Grandmiche, Bern, J.LANCELLE (†), jean-paul.perraudin0079, guyh et aiment ce message
Re: Le Mercure au 1/36 - plans Jean Boudriot
G. Delacroix Dim 12 Déc 2021 - 8:10
Belle démonstration et merci pour la traduction (j'ai modifié deux ou trois détails).
Vous ne placez pas l'ensemble quille-étrave-étambot avant de border ?
G. Delacroix- Admin
- Messages : 11128
Date d'inscription : 21/05/2010
Localisation : Toulouse -
HB 17 aime ce message
Re: Le Mercure au 1/36 - plans Jean Boudriot
Scooter Dim 12 Déc 2021 - 8:52
No the keel will be attached later after the hull is planked and sanded. I know this is unorthodox but it will allow a very clean join.
===========
Merci, M. Delacroix,
Non, la quille sera fixée plus tard, une fois la coque bordée et poncée. Je sais que ce n'est pas très orthodoxe, mais cela permettra un assemblage très propre.
Scooter- Messages : 141
Date d'inscription : 03/01/2020
Localisation : Adelaide, Australia
HB 17 aime ce message
Re: Le Mercure au 1/36 - plans Jean Boudriot
G. Delacroix Dim 12 Déc 2021 - 9:48
G. Delacroix- Admin
- Messages : 11128
Date d'inscription : 21/05/2010
Localisation : Toulouse -
Re: Le Mercure au 1/36 - plans Jean Boudriot
Scooter Dim 12 Déc 2021 - 10:07
I would like to try a framing approach with my next model which will be inline with the French style.
==========================
Oui, mes techniques sont russes, car j'ai appris avec le Dr Michael Bezvernhiy à Saint-Pétersbourg il y a quelques années, lorsque j'étais plus jeune et aventureux. C'était un homme merveilleusement patient, un perfectionniste et un gentleman. Il est certain, cependant, que l'intention est que le résultat final, une fois terminé, soit indiscernable du style français.
Je voudrais essayer une approche de charpente avec mon prochain modèle qui sera en ligne avec le style français.
Scooter- Messages : 141
Date d'inscription : 03/01/2020
Localisation : Adelaide, Australia
HB 17 aime ce message
Re: Le Mercure au 1/36 - plans Jean Boudriot
Daniel. Bétremieux Dim 12 Déc 2021 - 12:07
et, j'ai ainsi de bons conseils. Merci.
A plus,
Daniel.
Daniel. Bétremieux- Messages : 639
Date d'inscription : 04/04/2019
Localisation : Saint Pierre des Corps (37)
Re: Le Mercure au 1/36 - plans Jean Boudriot
Scooter Dim 12 Déc 2021 - 12:38
Please let me add one important point if you are approaching the bending phase.
With dry heat (Step 6 above) it is very slow and difficult to bend the plank almost 90 degrees. Especially my planks which are 3,5mm thick.
To assist me I have found the following 2 things help - although the process still takes time:
a) I run the plank through the thicknesser to make it thinner. Perhaps a thickness of 2,5mm (or even a little less) where it will bend. To build out the plank from the model I can attach a 1mm plank (of another timber material less valuable than pear) on the inside edge of my pear plank. Bending a few thinner planks with dry heat is easier than bending one thick plank. Of course you must ensure that the outermost plank will have enough thickness to withstand the final sanding.
b) I also taper the pear plank at the bow a little first with my scraper to remove material where it will bend. I do not taper to the exact final shape here but remove a some material only. Less material makes it easier to bend.
I find this extra thinning and removal of material makes it a little easier to bend with dry heat.
Once the correct final bend is achieved with dry heat then I can complete the tapering process exactly.
I find Step 6 (dry heat) and the tapering can take 2-3 hours per plank. This is why my progress is so slow.... I have to psychologically prepare myself every time I go to my workshop.

=====================
Bonjour Daniel et merci.
Permettez-moi d'ajouter un point important si vous abordez la phase de cintrage.
Avec la chaleur sèche (étape 6 ci-dessus), il est très lent et difficile de plier la planche à presque 90 degrés. Surtout mes planches qui ont une épaisseur de 3,5 mm.
Pour m'aider, j'ai trouvé les deux choses suivantes - bien que le processus prenne encore du temps :
a) Je passe la planche dans la raboteuse pour la rendre plus fine. Peut-être une épaisseur de 2,5 mm (ou même un peu moins) là où elle se pliera. Pour construire la planche à partir du modèle, je peux fixer une planche de 1 mm (d'un autre bois moins précieux que le poirier) sur le bord intérieur de ma planche de poirier. Il est plus facile de plier quelques planches plus fines à la chaleur sèche que de plier une seule planche épaisse. Bien sûr, vous devez vous assurer que la planche la plus extérieure aura une épaisseur suffisante pour supporter le ponçage final.
b) J'effile aussi un peu la planche de poire à l'avant avec mon grattoir pour enlever de la matière là où elle sera pliée. Je n'effile pas jusqu'à la forme finale exacte mais j'enlève un peu de matière seulement. Moins de matière facilite le pliage.
Je trouve que cet amincissement et cet enlèvement de matière supplémentaires facilitent un peu le cintrage à la chaleur sèche.
Une fois que la courbure finale correcte est obtenue avec la chaleur sèche, je peux terminer le processus d'effilage avec précision.
Je trouve que l'étape 6 (chaleur sèche) et l'effilage peuvent prendre 2 à 3 heures par planche. C'est pourquoi mes progrès sont si lents. .... Je dois me préparer psychologiquement chaque fois que je vais dans mon atelier.
Scooter- Messages : 141
Date d'inscription : 03/01/2020
Localisation : Adelaide, Australia
Daniel. Bétremieux aime ce message
Re: Le Mercure au 1/36 - plans Jean Boudriot
J.Guydal Dim 12 Déc 2021 - 13:31
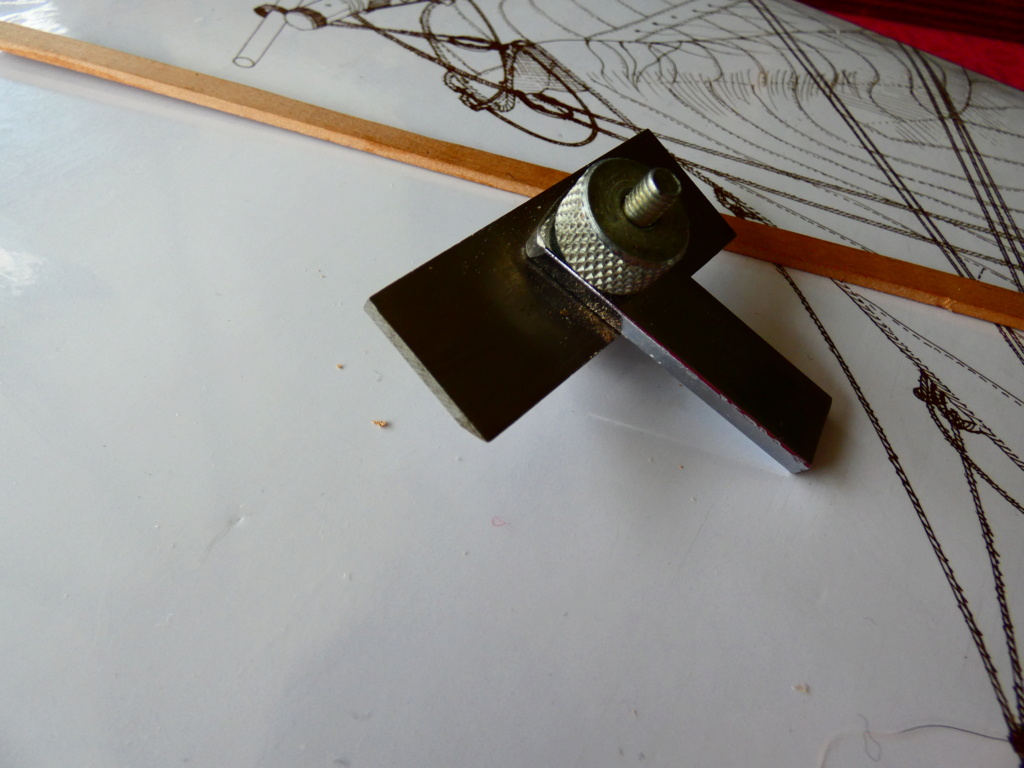
A mon sens celles-ci doivent être ajustées angulairement pour un parfait jointoiement des unes aux autres. L'un des coté seul suffit à obtenir un bon résultat.
Je propose pour cela une idée et un appareil de ma fabrication qui m'a bien rendu service. Il suffit de relever les angles à quelques différentes positions avec un gabarit de carton et de reproduire ces relevés sur le bordé à créer.
L'appareil très simple, est fait dans une lame de raboteuse et un simple morceau de fer plat ordinaire.


J.Guydal- Messages : 1092
Date d'inscription : 06/04/2018
Localisation : Brest
jean-paul.perraudin0079, galileo et HB 17 aiment ce message
Re: Le Mercure au 1/36 - plans Jean Boudriot
Scooter Dim 12 Déc 2021 - 14:02
I should explain, my planks are shaped with an angle on the edge such that the join with the plank next to it is correct. I adjust the height of the flat wood in my photo to change the angle that the scraper makes with my pear plank. In other words with my scraper can achieve any required angle (rather than just 90 degrees). In fact, in the plank I made the angle is approximately 70 degrees.
However, your invention is very interesting and perhaps would result in a more consistent angle. I can see the value.
Thank you for bringing this to my attention.
=========================
Bonjour.
Je m'explique, mes planches sont façonnées avec un angle sur le bord tel que la jonction avec la planche d'à côté soit correcte. Je règle la hauteur du bois plat sur ma photo pour modifier l'angle que fait le racloir avec ma planche de poirier. En d'autres termes, mon grattoir peut atteindre n'importe quel angle (et pas seulement 90 degrés). En fait, sur la planche que j'ai fabriquée, l'angle est d'environ 70 degrés.
Cependant, votre invention est très intéressante et permettrait peut-être d'obtenir un angle plus constant. Je peux en voir l'intérêt.
Merci de l'avoir portée à mon attention.
Scooter- Messages : 141
Date d'inscription : 03/01/2020
Localisation : Adelaide, Australia
HB 17 aime ce message
Page 10 sur 10 • 1, 2, 3, 4, 5, 6, 7, 8, 9, 10
Marine et Modélisme d'Arsenal :: MONOGRAPHIES :: MONOGRAPHIES :: Le Mercure 1730 - Plans Jean Boudriot
|
|
|